

For HR's / Corporates
Every Field on the Job Posting Form, Step by Step
A field-by-field reference for steps 1 and 2 of the posting form — every mandatory field, the eligibility filters that quietly decide who can apply, and the exact validation messages that block you.
Updated 19 Aug 2026
Short answer: Steps 1 and 2 carry the most fields and cause almost all the confusion. Step 1 has eleven mandatory fields; step 2 has four things people routinely miss. This is the reference for both.
📋 Fields marked with a red asterisk are mandatory. The form will not advance until every one on the current step is filled.
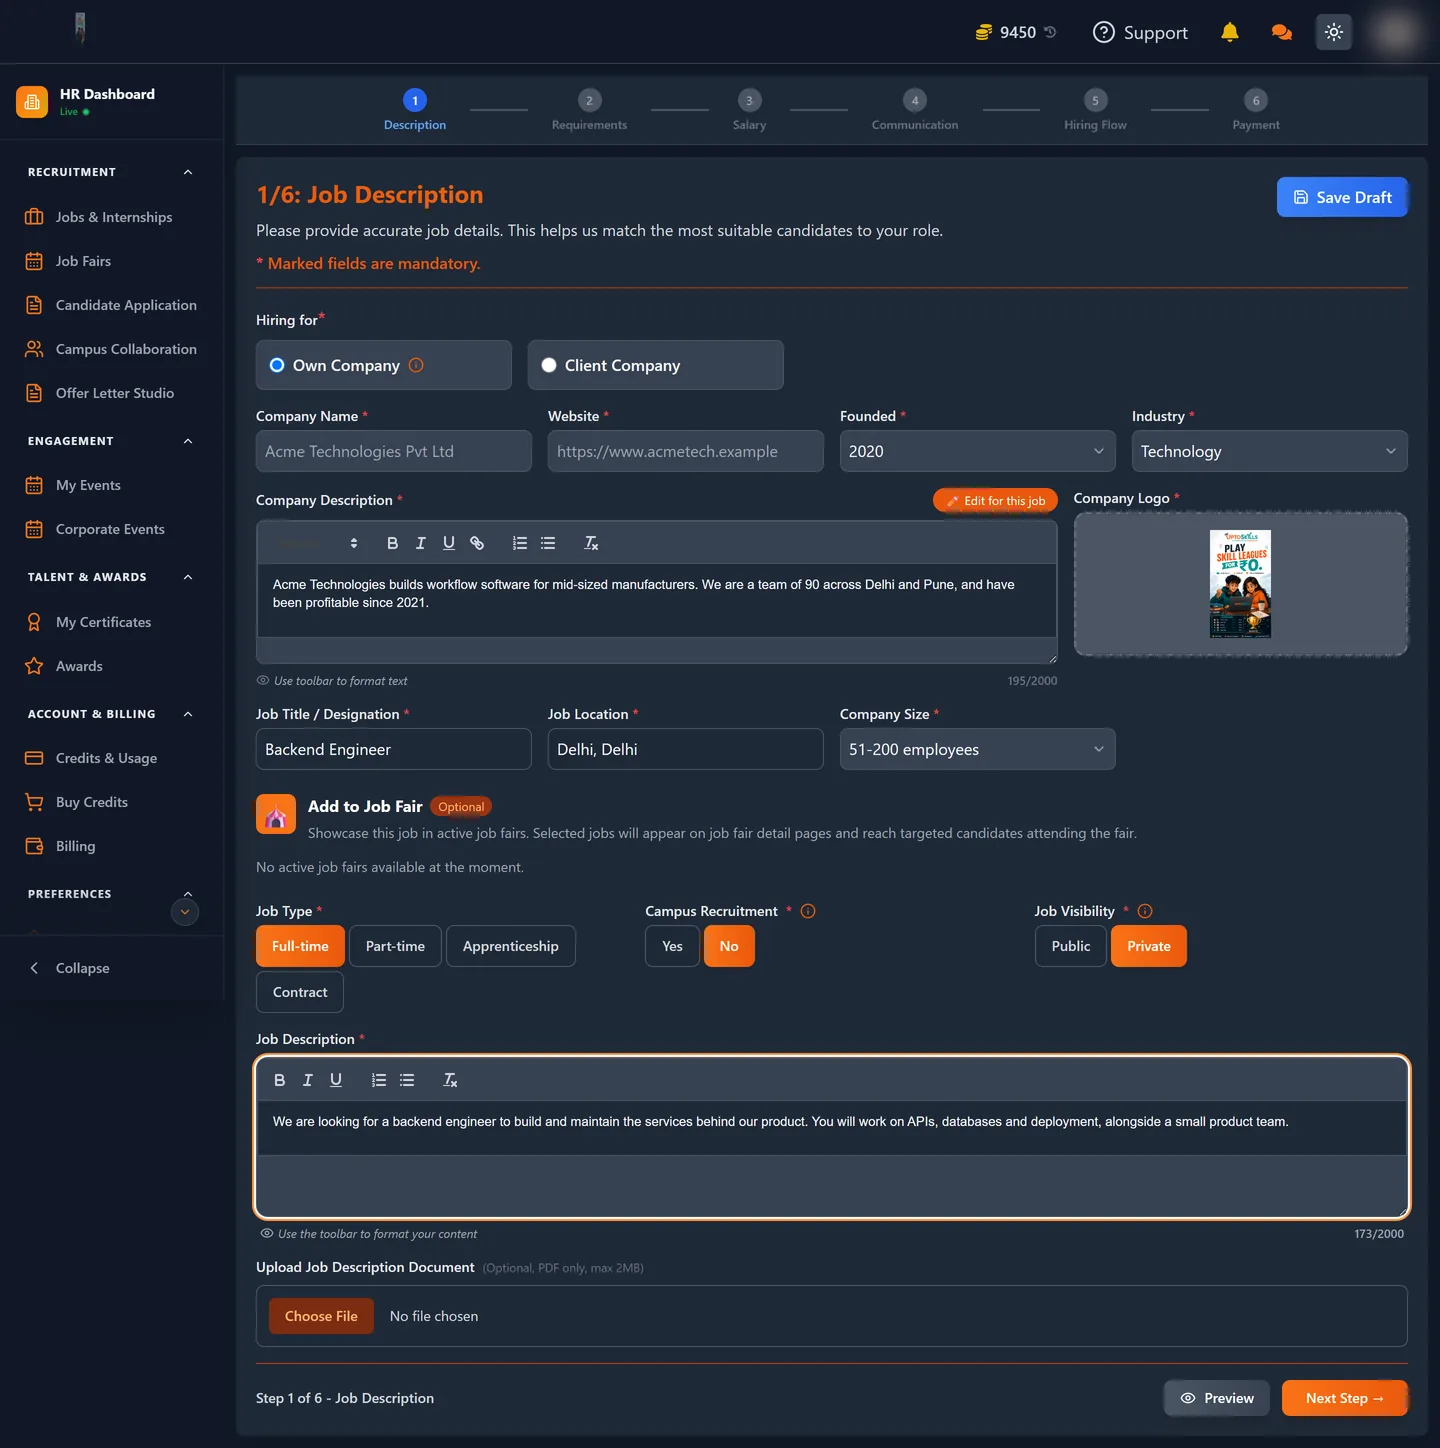
Step 1: Job Description
Hiring for
Choose Own Company or Client Company. Pick Client Company if you are a consultancy hiring on someone else's behalf — it changes whose details appear on the listing.
Company block
| Field | Notes |
|---|---|
| Company Name | Required |
| Website | Required |
| Founded | Required — year picker |
| Industry | Required — from a list |
| Company Description | Required — rich text, up to 2,000 characters, with bold, italic, underline and lists |
| Company Logo | Required — max 500 KB, which is stricter than the 2 MB verification limit |
| Company Size | Required — from a list |
The job itself
- Job Title / Designation — required
- Job Location — required, as City, State
- Job Type — required: Full-time, Part-time, Apprenticeship or Contract
- Campus Recruitment — required: Yes or No
- Job Visibility — required: Public or Private
Add to Job Fair (optional)
Shows the role in an active job fair so it reaches candidates attending. If none are running you will simply see "No active job fairs available at the moment."
Step 2: Job Requirements
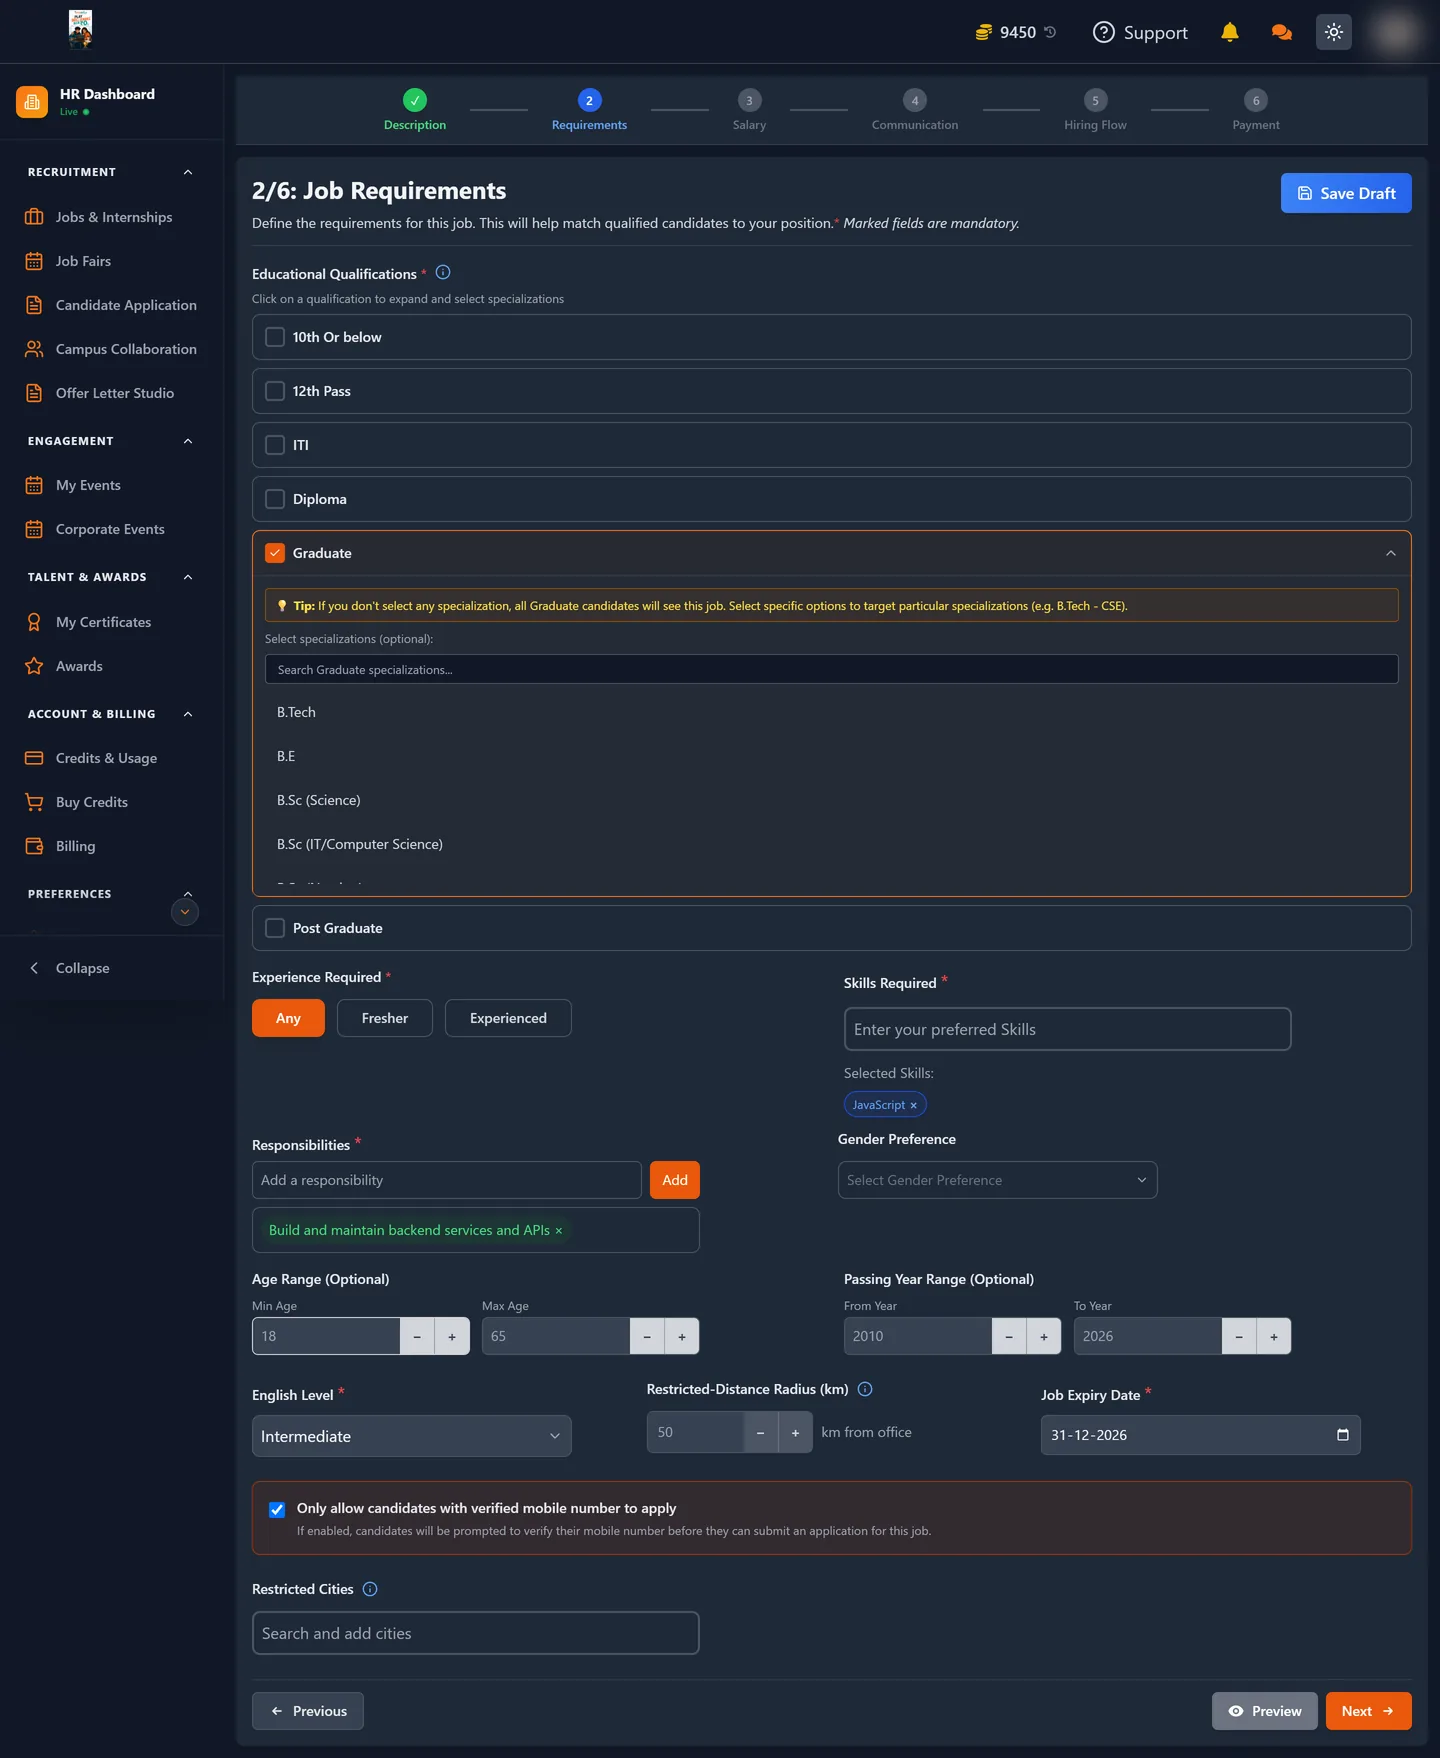
The four that block you
These produce the validation messages people hit most often:
| Message | What it wants |
|---|---|
| At least one qualification is required | Tick at least one of ITI, Diploma, Graduate, Post Graduate |
| At least one skill is required | Type a skill and press the Add button — typing alone does not register it |
| English level is required | Choose from the dropdown |
| Job expiry date is required | Set the date the listing should close |
💡 The skills and responsibilities boxes both need their Add button pressed. Text sitting in the input is not saved.
Eligibility filters
- Experience Required — Any, Fresher or Experienced
- Responsibilities — added one line at a time
- Gender Preference — optional
- Age Range — optional; maximum age cannot exceed 65
- Passing Year Range — optional, useful for targeting a graduating batch
Three settings that quietly decide who can apply
These are easy to skip past and have a large effect on your applicant volume:
| Setting | Effect |
|---|---|
| Restricted-Distance Radius (km) | Only candidates within this many kilometres of your office can apply |
| Restricted Cities | Limits applications to named cities |
| Only allow candidates with verified mobile number to apply | Candidates are made to verify their number before they can submit |
The verified-mobile setting is worth thinking about both ways. It raises the quality of the contact details you later pay to unlock, but it also turns away anyone who has not verified yet. If a role is getting far fewer applications than you expected, this is one of the first things to check.
Step 3: Salary and Benefits
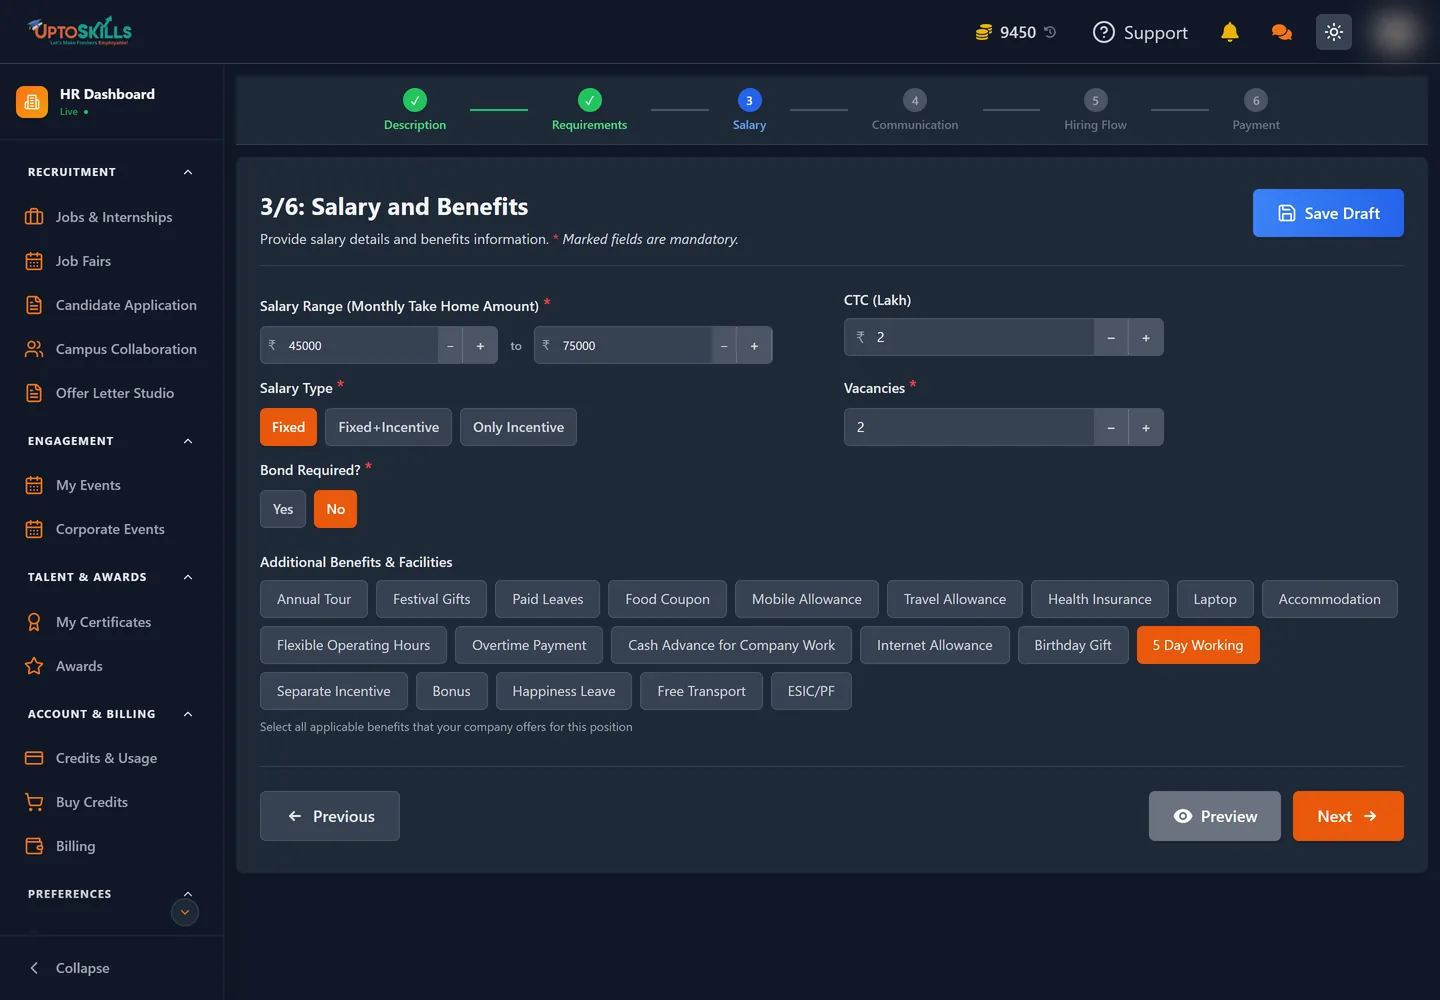
Read the label on the range carefully: it is Monthly Take Home Amount, not annual. Entering an annual figure here is the single most common mistake on this step, and it publishes a role advertising several lakh a month.
| Field | Notes |
|---|---|
| Salary Range | Required. Minimum must be at least ₹1,000 and the maximum must be greater than the minimum. |
| CTC (Lakh) | Optional. The annual cost to company, in lakhs — this is where the yearly number belongs. |
| Salary Type | Required: Fixed, Fixed+Incentive or Only Incentive |
| Vacancies | Required. How many people you are hiring for this role. |
| Bond Required? | Required: Yes or No. Answering Yes adds two more mandatory questions — the bond fee options, and when candidates have to pay. |
| Additional Benefits | Optional chips: Paid Leaves, Health Insurance, Laptop, 5 Day Working, Food Coupon, Travel Allowance and about a dozen more. |
The benefits chips cost nothing and take ten seconds. For fresher roles especially, "5 Day Working" and "Health Insurance" are read closely.
Step 4: Communication Settings
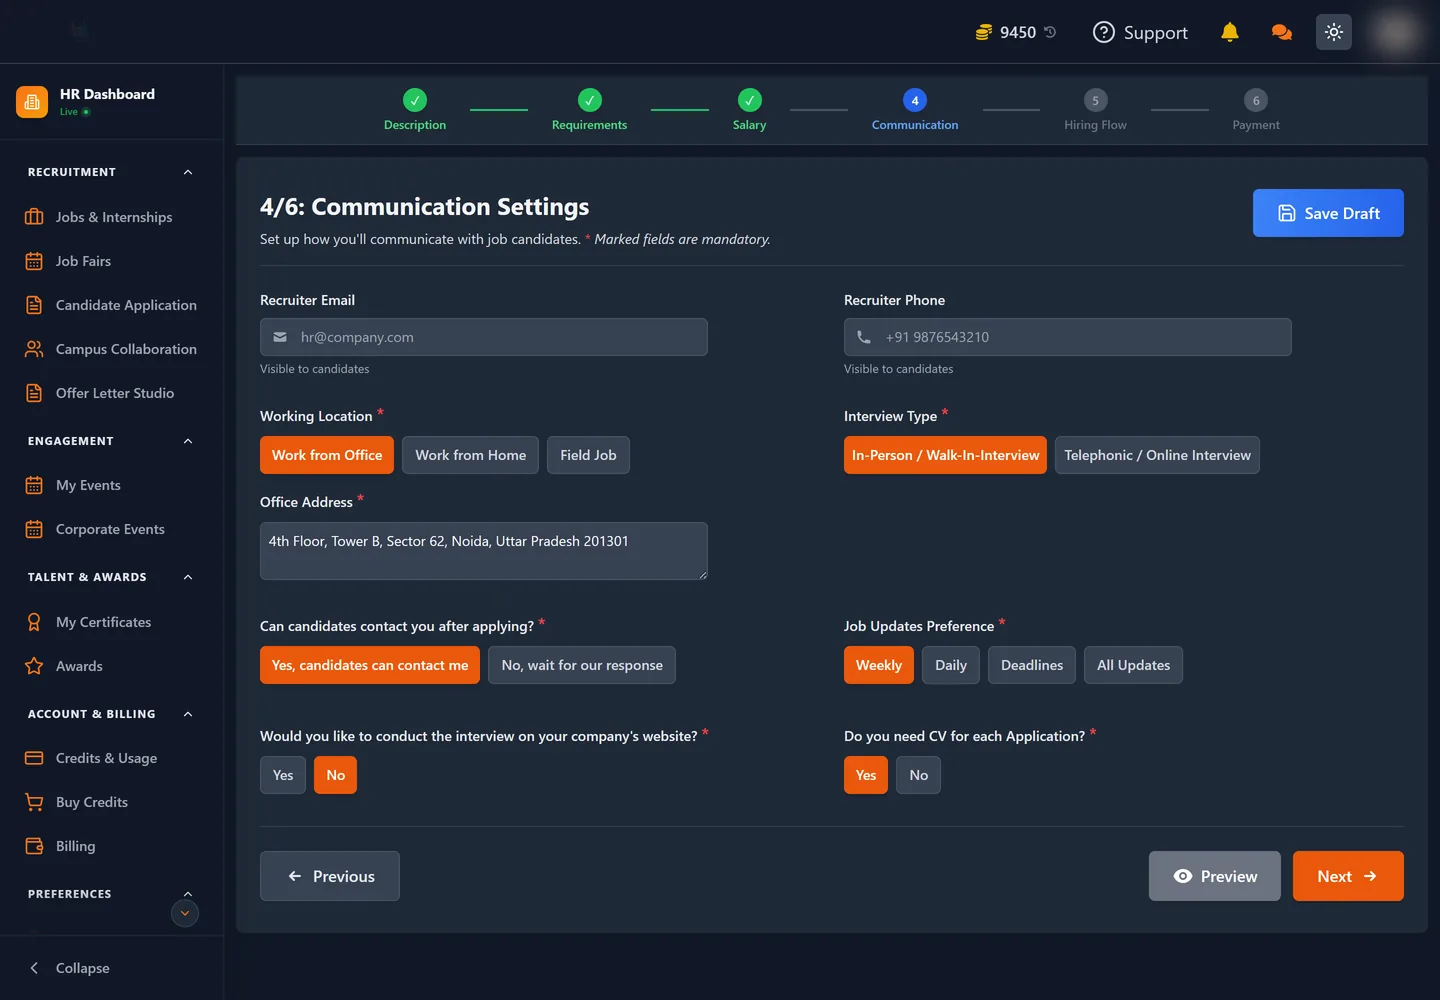
Six mandatory choices, each a simple pick, plus two optional contact fields:
| Field | Options |
|---|---|
| Recruiter Email | Optional, but marked visible to candidates |
| Recruiter Phone | Optional, also visible to candidates |
| Working Location | Work from Office, Work from Home or Field Job. Office and Field add a mandatory address field. |
| Interview Type | In-Person / Walk-In, or Telephonic / Online |
| Can candidates contact you after applying? | Yes, or "No, wait for our response" |
| Job Updates Preference | Weekly, Daily, Deadlines or All Updates |
| Conduct the interview on your company's website? | Yes or No. Answering Yes makes a company website link mandatory. |
| Do you need CV for each Application? | Yes or No |
📞 The two contact fields are optional but they are shown to candidates. Leave them blank rather than filling them with a number nobody answers.
Job Updates Preference controls how often you are emailed about the role, not the candidates. On a high-volume posting, Daily quickly becomes noise; Weekly plus checking the dashboard is usually the better setting.
Steps 5 and 6
- 5 — Hiring Flow: pick the default pipeline or build your own. Covered in full in Hiring Flows: Default vs Custom.
- 6 — Payment: review and confirm. Posting a job is free on the default rate — the charges come later, when you unlock candidates or move them through the pipeline.
Where to go next
- How to Post a Job or Internship — the overview, drafts and templates
- Hiring Flows: Default vs Custom